Watercolour Turtorial - An Enchanted Encounter
I'm trying more recently to make time for painting for myself, just for pleasure or experimentation, or to let my creativity flow where it wishes.
I thought it might be nice to write and photograph a step by step guide to my processes. My painting style is relatively simple, using pen and watercolour, and so should be accessible to most beginners.
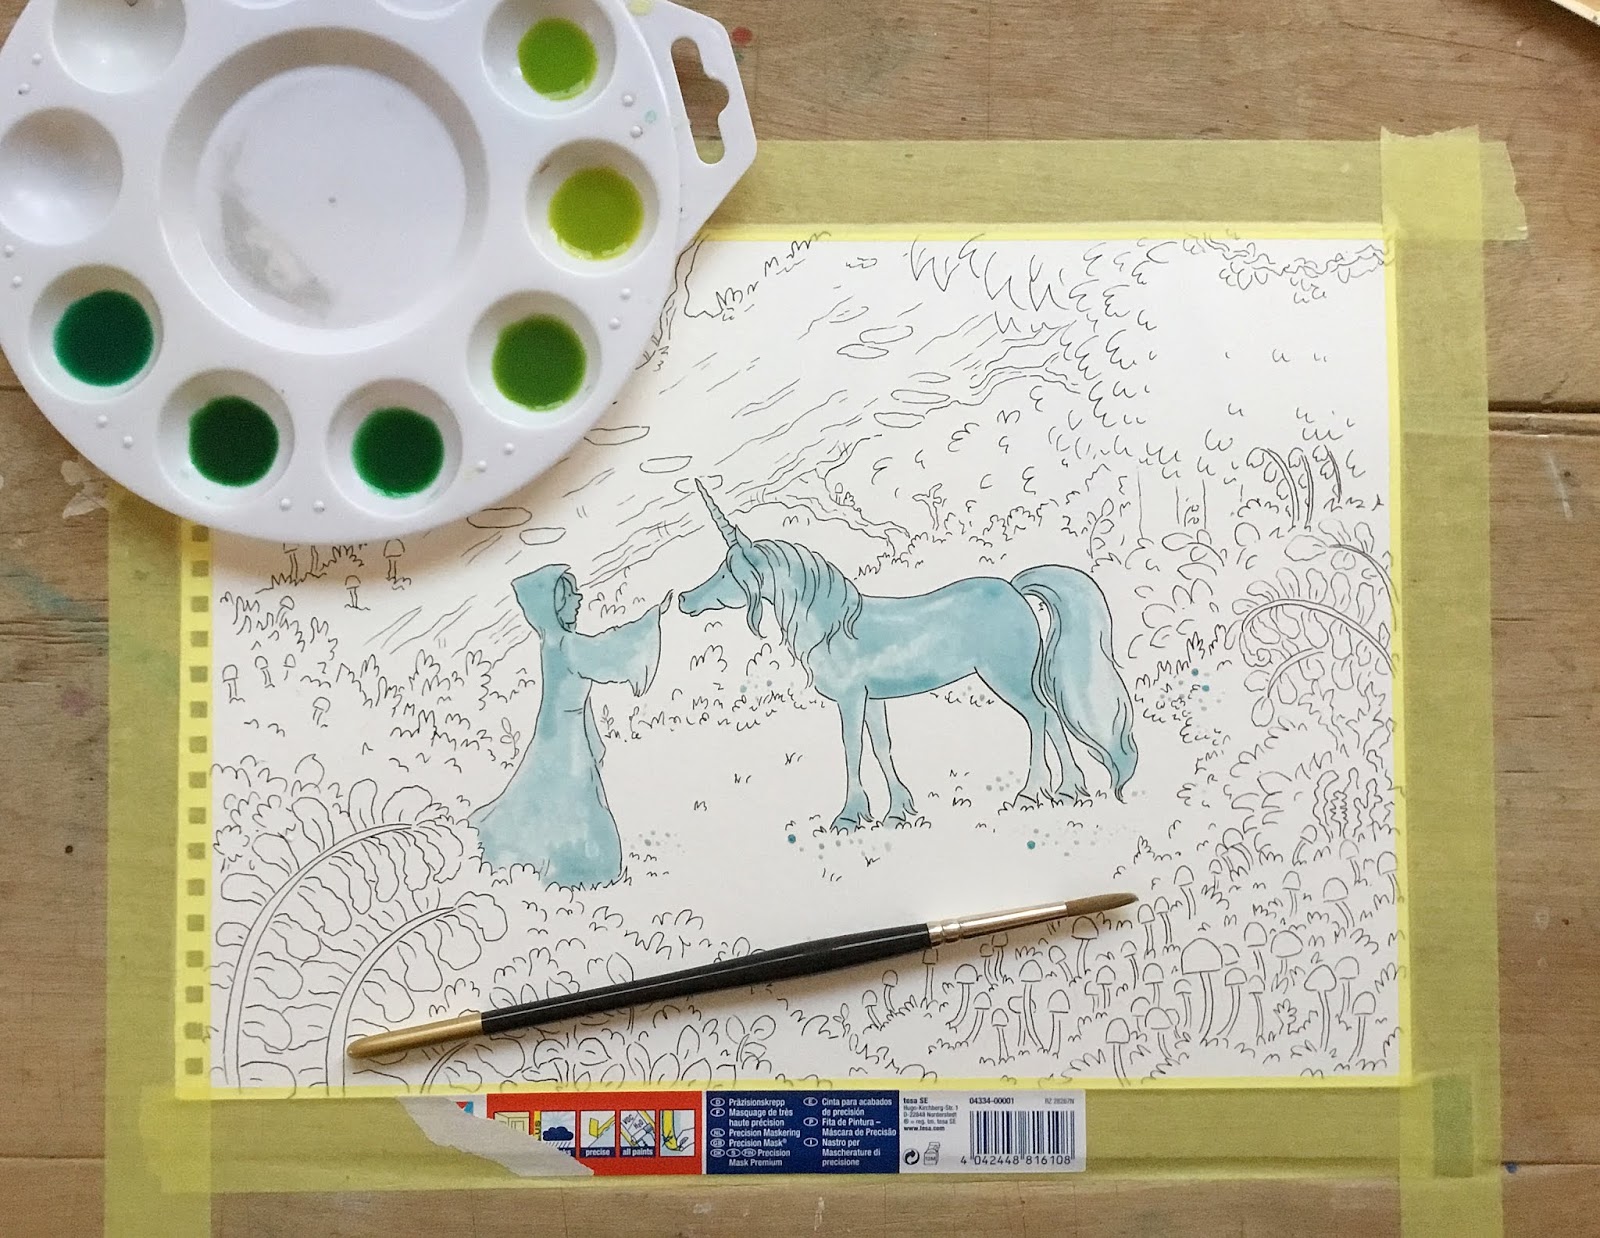
This is my latest painting, 'An Enchanted Encounter' and features a young woman meeting a gleaming white unicorn in a sunlit glade of the forest.

For this painting you will need:
- UniPin Fine Line Pen (0.1 or 0.2)
- HB pencil and gentle eraser for mistakes
- A4 hot pressed watercolour paper (I use Aquafine smooth 300gsm paper).
- Good quality watercolour paints
- Masking fluid and brushes
- Masking tape
- Watercolour pallet
- Paint brushes (I use Daler Rowney Aquafine Round size 2 for the details, and a size 7 or 8 for the wash).
Linework
The first stage is imagining the scene and composition of the painting, and sketching it out in pencil. Try to draw really lightly and avoid making too many mistakes, as too much use of the eraser will damage the watercolour paper.
I used a variety of leaf shapes, foliage textures and fungi to add interest to the forest surroundings.
I used a variety of leaf shapes, foliage textures and fungi to add interest to the forest surroundings.
Once you are happy with your pencil sketch, go over the lines with your UniPin fine line pen very neatly. Once the pen is dry, you can gently erase the pencil lines.

Masking Fluid and tape
Masking fluid is a pale blue liquid that dries like rubber or glue. You can apply it carefully onto places which you want to avoid painting until later on. It rubs off easily and then you can paint the area underneath. This technique enables you to get a nice smooth wash of paint.
I applied the masking fluid to the girl and the unicorn, and a small tiny dots around the mossy grass at their feet so it would look like little tiny white flowers once it was rubbed away.
I also used masking tape to stick the paper to the table. This helps to keep the paper straight if it starts to buckle under the weight of the watercolour being applied.

Preparing the colours for the wash
I used a variety of greens for the wash, ranging from pale yellowish green, to dark green with a blueish tone.
Applying the wash
First, paint the whole piece lightly with clean water using the large sized brush. This helps to prepare the paper for the wash and ensures that you get a nice smooth coverage of paint with no unsightly drying lines. Once the paper is prepared, you can apply the wash.
I used all of the colours in my pallet for the wash, with the lighter, yellowish tones in the centre, and the darker tones around the outside. This should help to draw the eye to the centre of the page and the main characters.

Adding the detail; layer by layer
Once the wash is completely dry, you can start adding detail and texture to the foliage all around. Again, make sure to use the lighter tones in the centre where you want to draw the eye, and darker tones around the outside and behind the fallen tree to create depth.
I use a light, 'dabbing' paint brush stroke to create texture and leaving pale areas of wash still showing underneath to create a dappled light and shade effect reminiscent of forests. The mushrooms and fungi were coloured a pale orange to add interest to the scene. And behind the fallen tree I left leaf shaped areas of unpainted wash to add more depth and detail to the background foliage.
Let each layer of detail dry before applying more watercolour over the top.

Rub away the masking fluid
Once the painting is completely dry, gently rub away the masking fluid with a clean finger, leaving the clean, untouched paper underneath.

Paint the characters
Paint the characters in two simple layers, using first a simple (but bold) colour wash, followed by a layer adding detail and shadow (shadows on the cloak and unicorn's tail, redness to the woman's cheeks).
I used a dark greyish blue for the woman's cloak, as I wanted her to blend in with the forest almost. For this painting the unicorn needs to be the one who stands out, bright and white in the darkness of the forest. The unicorn is gently painted in a gentle white wash and then shade and detail is added using a pale grey and purple blend.

Take a break
I always find its useful to take a break from paintings before declaring them finished. Fresh eyes often spot mistakes or areas needing improvement easier. So give yourself a rest, and come back later.
Finishing touches
Take a look at the painting again with fresh eyes, and add little bits of detail or colour where you think it's needed. Once you're satisfied, you need to let the painting dry again, and then gently remove the masking tape from around the edges.
And now smile! Your painting is complete!

A final note
Please don't forget that art should be, first and foremost, an enjoyable and leisurely activity.
You may not be 100% pleased with your finished piece (I rarely am) but you will have learned something along the way. Practising art involves a lifetime of learning and striving to be better and, if it's taught me anything, it's to be patient with myself.
Let me tell you a secret, there is not really such a thing as 'talent'. There is only years of hard work, practice, and many, many imperfect attempts along the way.
Remember, Art should be done for the joy of it, and it doesn't have to be perfect.

Comments
Post a Comment